Red Velvet Love Bundt Cake Recipe
Want to try a Red Velvet Love Bundt Cake? I’ll show you how to make it yourself in this post.
I learnt how to bake from a famous bakery shop down my road. Aunty Mabel was the very best at what she does.
Before the day we were to bake the Red Velvet Love Bundt Cake, she kept telling us how much we would love it. The long-awaited day came, and everyone was excited.
We gathered around the kitchen, the Bundt pan ready, bowls lined up, and ingredients on the counter.
Aunty Mabel showed us each step carefully, explaining why we needed to mix gently and why the cake’s color mattered.
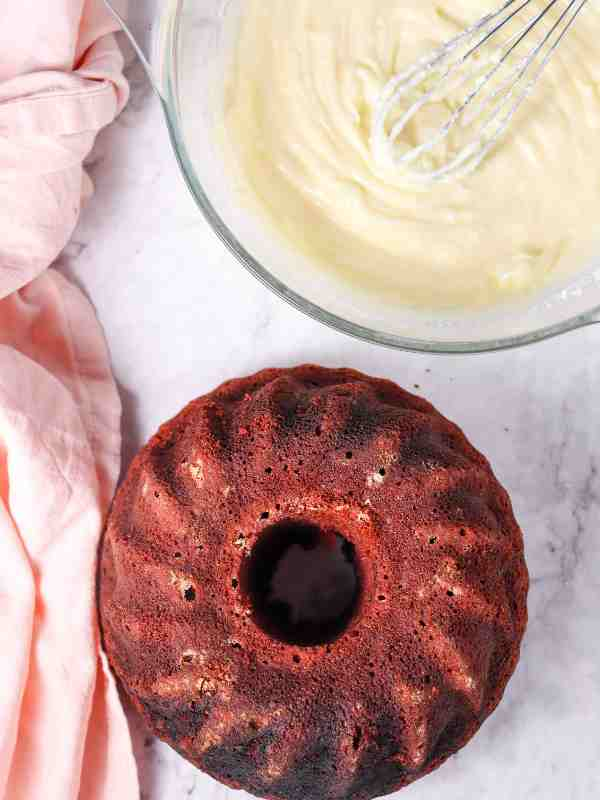
As we poured the batter into the pan, I remember thinking how perfect it looked, deep red, smooth, and ready for the oven.
While it baked, the kitchen filled with a soft chocolatey smell with a hint of vanilla. Everyone kept peeking into the oven, waiting for the first glimpse.
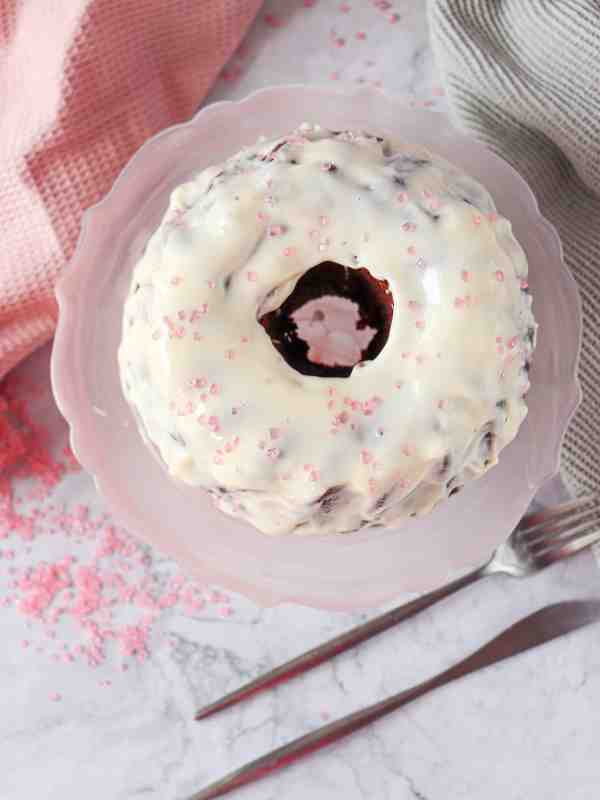
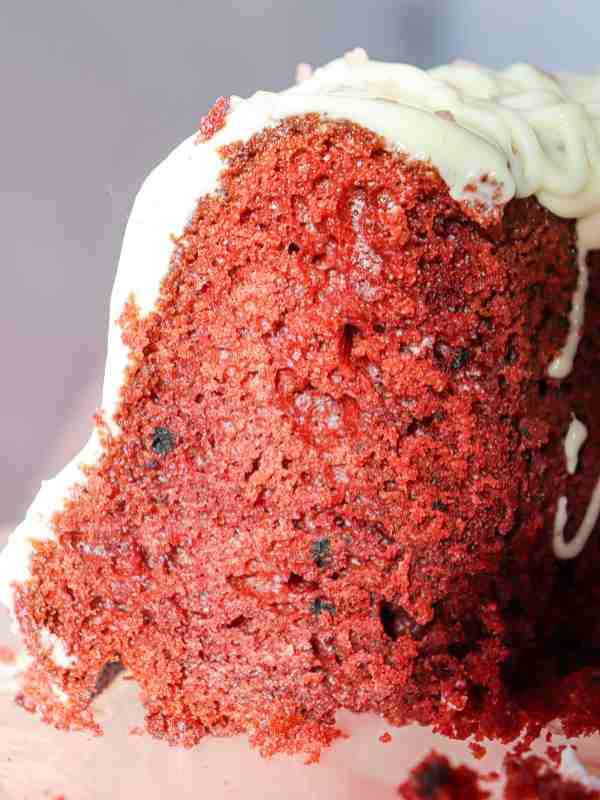
When it finally came out, golden edges and rich red in the middle, it was more than just a cake, it felt like a little celebration we all made together.
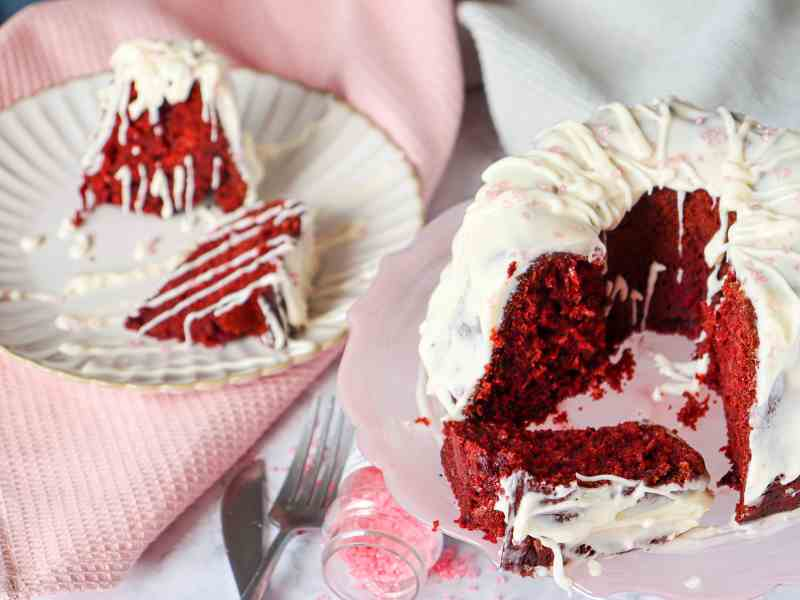
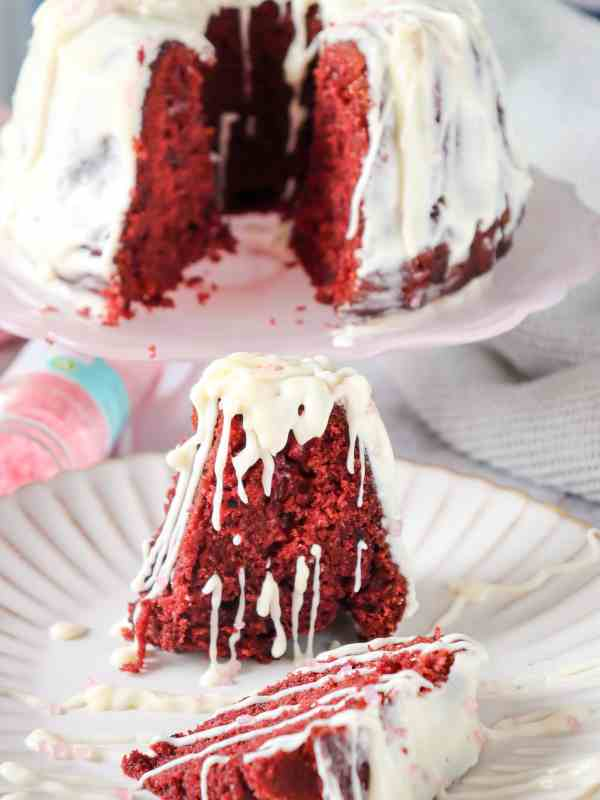
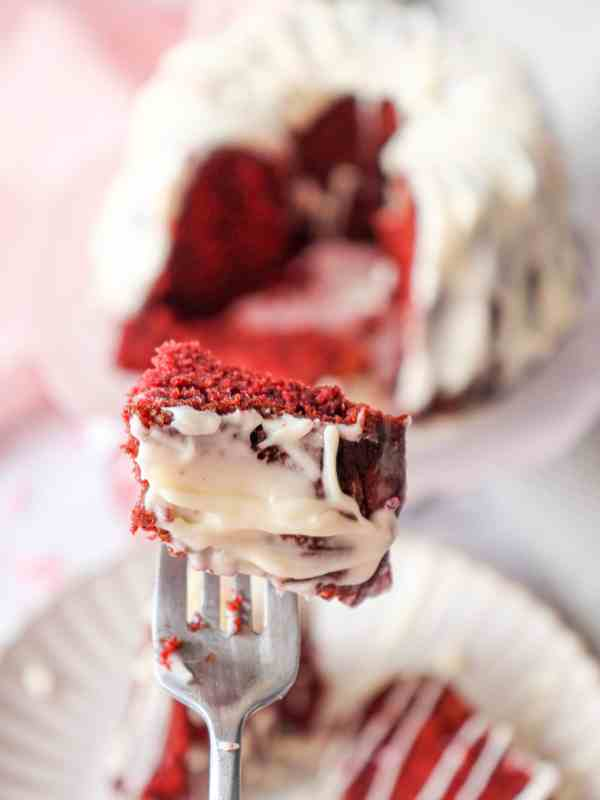
The cream cheese glaze went on smoothly, and the first slice was soft, slightly chocolatey, with just enough sweetness.
Everyone at the table smiled with each bite, and I could see why Red Velvet has been a favorite for so long.
That day, I learned not just how to bake a cake, but also how making something together can be simple, fun, and memorable.
Background:
Red Velvet Cake has been a favorite in American kitchens for nearly a century. Its exact origin is a bit of a story, some say it started in the 1920s in upscale bakeries, while others link it to traditional Southern recipes.
Originally, the red color came from a reaction between natural cocoa and acidic ingredients like buttermilk or vinegar.
Over time, bakers began using food coloring to get that striking red everyone recognizes today.
Traditionally, Red Velvet is paired with cream cheese frosting, which adds a little sourness that balances the sweetness of the cake.
Over the years, people have experimented with different glazes, fillings, and even layers. Some add chocolate chips, cream cheese filling, or berries, giving the cake a small creative taste while keeping the classic flavors intact.
Ingredients Required for this Recipe:
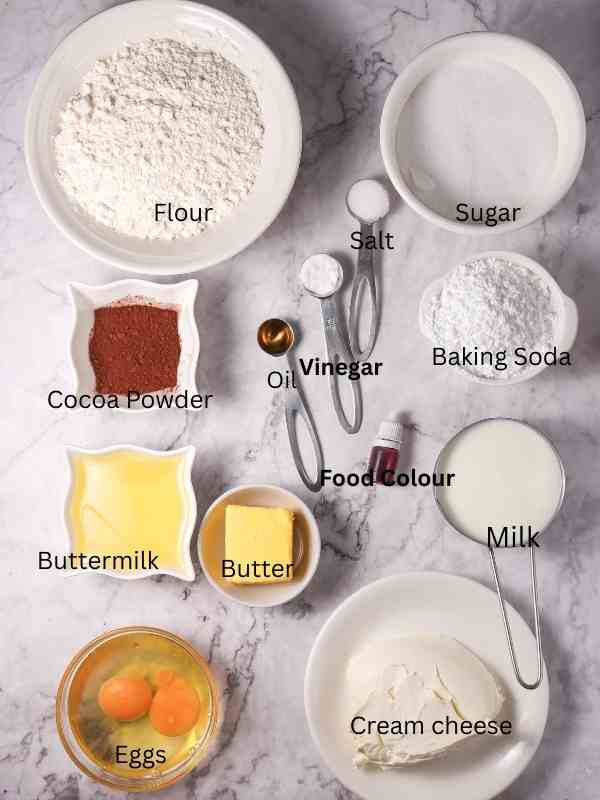
Every ingredient in a Red Velvet Love Bundt Cake has a purpose. When they all come together, that’s what gives the cake its soft texture, gentle cocoa flavor, and signature red look.
Here’s a breakdown:
- Flour – The base of the cake. It gives structure so the cake holds its shape while still staying tender.
- Sugar – Adds sweetness but also helps keep the cake soft and moist.
- Cocoa Powder – Not too much, just enough to give that mild chocolate flavor without overpowering.
- Eggs – Work as a binder. They hold everything together and add richness.
- Buttermilk – A key ingredient in Red Velvet. Its acidity reacts with baking soda to help the cake rise, while also keeping it moist.
- Oil or Butter – Adds fat, which makes the crumb soft and tender. Oil gives extra moisture while butter adds flavor. Some recipes use a mix of both.
- Baking Soda – Works with the acidic buttermilk and vinegar to create air bubbles that make the cake light.
- Vinegar – A small amount, but important. It enhances the red color and supports the rise of the cake.
- Red Food Coloring – What gives the cake its classic, bold red color. Without it, the cake would look more like a light chocolate cake.
- Salt – Balances sweetness and brings out the flavor of cocoa and vanilla.
- Vanilla Extract – Adds warmth and depth to the flavor.
Frosting Ingredients
- Cream cheese – Adds a creamy, slightly sharp flavor that balances the sweetness of the cake.
- Butter – Makes the frosting smooth and rich.
- Powdered sugar – Sweetens and thickens the frosting.
- Sprinkles (optional) – A fun decoration that adds color and a little crunch.
Instructions:
- Preheat & Prepare
Start by preheating your oven to 350°F (175°C). Grease your Bundt pan generously with butter or non-stick spray, then lightly dust with flour to prevent sticking. A Bundt pan has lots of curves, so make sure you get into every corner.
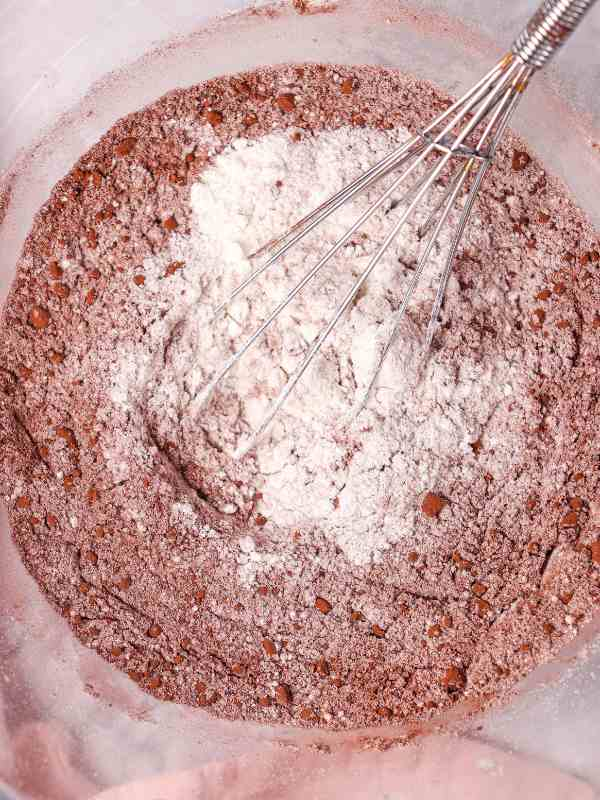
2. Mix Dry Ingredients

In a large bowl, whisk together the flour, cocoa powder, baking soda, and salt. This ensures everything is evenly distributed and avoids clumps of cocoa.
3. Cream Wet Ingredients
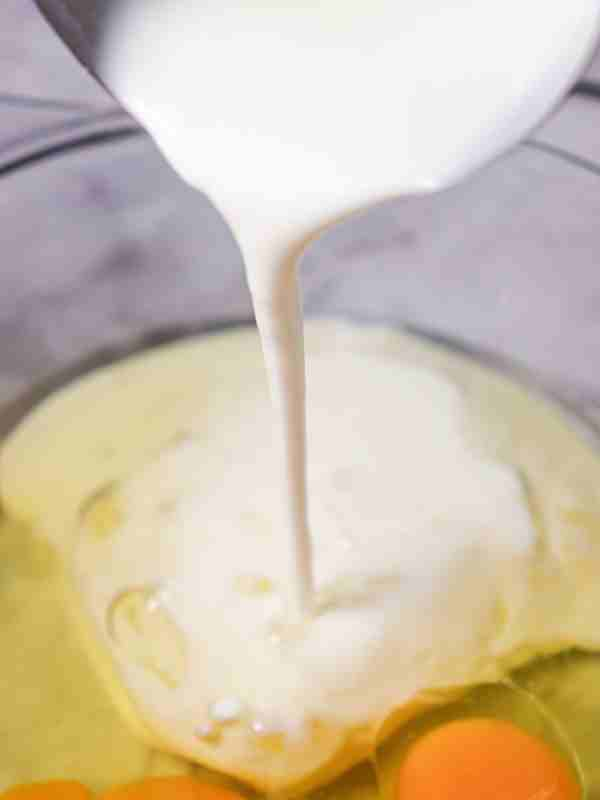
In another bowl, beat together the sugar and oil (or butter, if using) until smooth. Add in the eggs one at a time, mixing well after each. Stir in the vanilla extract.
4. Combine with Buttermilk
Slowly add the dry mixture into the wet, alternating with buttermilk. Start and end with the dry mix. This helps keep the batter smooth without overmixing.
5. Add Color & Vinegar
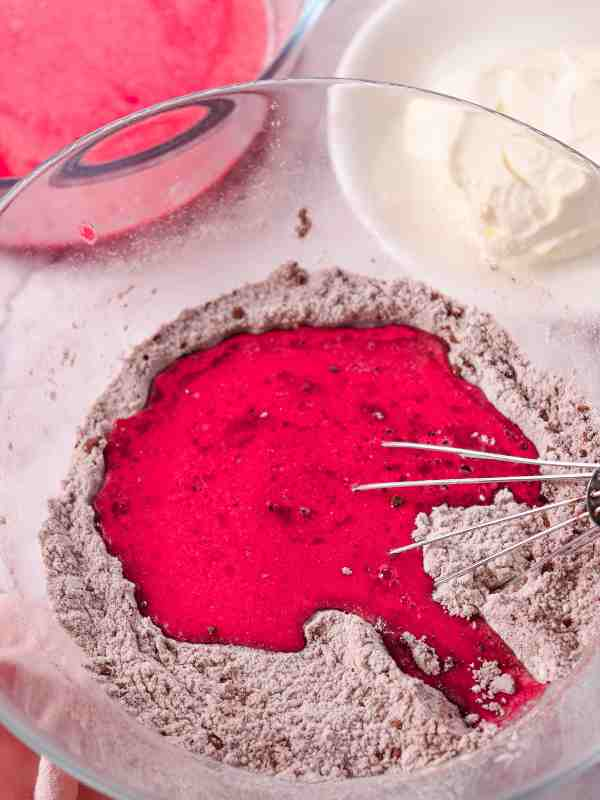
Stir in the red food coloring until you get that classic deep red shade. Finally, mix in the vinegar.
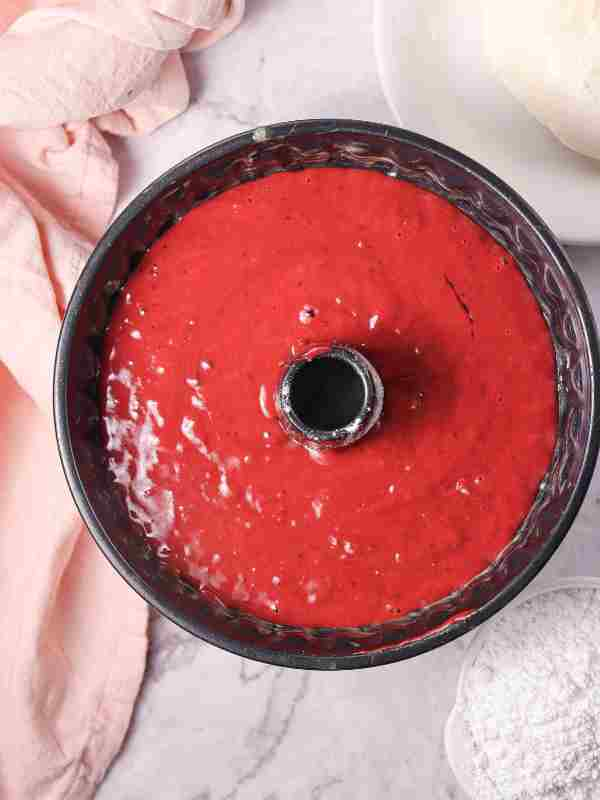
6. Pour into Pan

Pour the batter evenly into the Bundt pan. Tap the pan lightly on the counter to release any trapped air bubbles.
7. Bake
Place in the oven and bake for 45–55 minutes, or until a toothpick inserted in the center comes out clean. Bundt cakes are thicker, so they usually need a little extra time.
8. Cool Properly
Let the cake cool in the pan for 15 minutes before carefully flipping it onto a wire rack. If you rush this step, the cake might stick or break.
9. Decorate & Serve
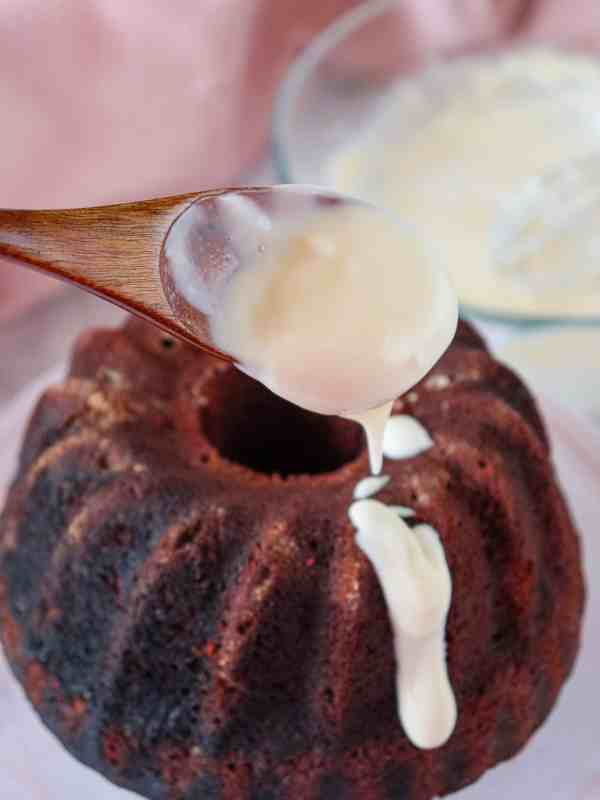
Once cooled completely, pour cream cheese glaze or dust with powdered sugar. You can even add fresh berries or edible flowers for a romantic touch.
Variations:
One good thing about baking is that you can always switch things up a little to make the recipe your own.
If you don’t have some ingredients on hand, or you just want to try something different, here are a few easy variations:
- Chocolate Chips: Mix in a handful of chocolate chips before baking. They melt inside the cake and give little sweet bites.
- Nuts: Walnuts or pecans add a nice crunch. Just chop them small so they spread evenly.
- Fruits: Fresh berries like strawberries or raspberries can be added for a fruity kick. Dried cranberries also work well.
- Cream Cheese Swirl: Drop small spoonfuls of sweetened cream cheese into the batter and swirl it lightly with a knife for a soft, creamy surprise in each slice.
- Glaze Toppings: Instead of the usual icing, you can pour a simple lemon glaze or even melted chocolate on top.
Storage Ideas
Homemade cakes are best when they’re fresh, but you can still keep them soft and tasty for later.
If you’ll be eating it in the next couple of days, just cover the cake with foil or plastic wrap and leave it on the counter. It stays moist that way.
If you need to keep it longer, place the cake in an airtight container and store it in the fridge. It can last up to a week.
Before serving, let the slices sit out for a bit so they come back to room temperature and don’t taste cold and firm.
For even longer storage, you can freeze the cake. Wrap it tightly in plastic wrap, then foil, and keep it in the freezer.
When you want a slice, leave it overnight in the fridge. It will still taste homemade and comforting.
Common Mistakes to Avoid
Even an easy cake can go wrong if a few small details are missed.
Here are some things to watch out for:
- Overmixing the batter – Stirring too much can make the cake heavy instead of soft. Mix just until everything comes together.
- Not measuring ingredients properly – Adding too much flour or too little liquid can change the texture completely. Level off your measuring cups for accuracy.
- Opening the oven too early – Checking too soon can make the cake sink in the middle. Wait until it’s almost done before peeking.
- Skipping the cooling step – Cutting the cake while it’s still hot can make it crumble. Let it rest a little so it sets properly.
- Using the wrong pan size – A pan that’s too small will overflow, while one that’s too big can make the cake dry out.
Creative Presentation Ideas
How you serve your cake can make it look just as good as it tastes. A few small touches can turn a simple cake into something special:
- Dust with sugar or cocoa – A light sprinkle on top gives the cake a soft, pretty finish.
- Add fresh fruits – Strawberries, blueberries, or slices of orange can brighten up the plate.
- Use a drizzle – Pour a little melted chocolate, caramel, or a thin sugar glaze over the cake to make it look polished.
- Serve in slices with extras – Place each slice on a plate with a scoop of ice cream, a spoon of whipped cream, or some drop of honey.
- Decorate with nuts or sprinkles – A few almonds, walnuts, or colorful sprinkles on top can add texture and a fun look.
Healthier or Lighter Versions

If you love cake but want something a little lighter, there are some easy alternatives you can try.:
- Use whole wheat flour – It adds more fiber and makes the cake a bit healthier.
- Cut down on sugar – You can use less sugar or replace part of it with honey, maple syrup, or mashed bananas.
- Replace butter with yogurt or applesauce – This keeps the cake soft and moist but with less fat.
- Add fruits or veggies – Grated carrots, zucchini, or apples can make the cake naturally sweet and moist.
- Choose lighter toppings – Instead of heavy frosting, go for a simple yogurt glaze or fresh fruits on top.
You just read about: Red Velvet Love Bundt Cake.