Yamarita
If you grew up in a Nigerian household, fried yam holds a very special place in your heart and your stomach! But what if I told you that there’s a version of fried yam that is so much better. So much crispier, and so much more flavourful that once you try it, you’ll never look at regular fried yam the same way again? That’s exactly what Yamarita is, and today we’re making it from scratch.

Yamarita takes everything you already love about fried yam and turns it all the way up. We’re talking a gorgeous golden coating that is crispy on the outside, warm and fluffy on the inside. With just the right hint of sweetness and a little kick of pepper that keeps you reaching for more. It’s the kind of food that disappears off the plate before you even get a chance to sit down. Honestly, we don’t blame anyone for that.
What makes Yamarita truly special is how simple it is to make. You don’t need any fancy equipment or hard-to-find ingredients. Just good yam, a handful of pantry staples, and a little bit of love and patience and you’ll have something that looks and tastes like it came straight out of a restaurant kitchen. Whether you’re making it for breakfast, as a snack, or as a full meal with a delicious side, Yamarita always shows up and shows out.
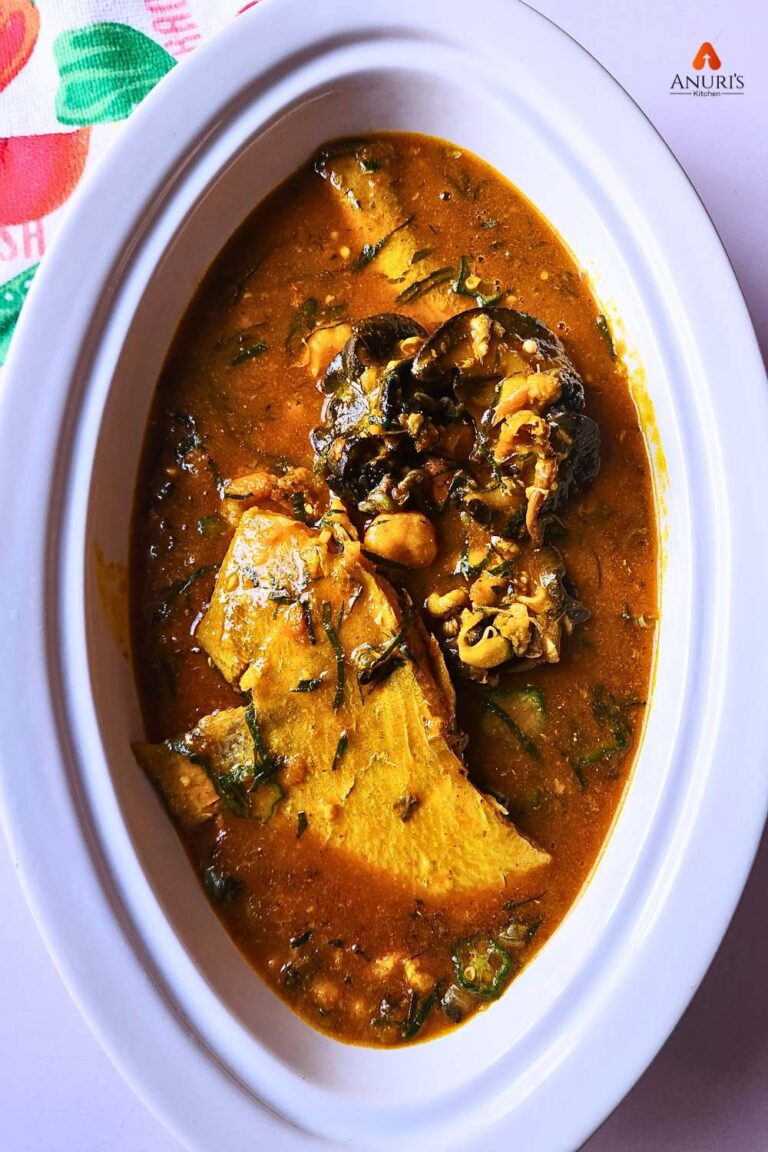
See this mouthwatering recipe: Creamy coconut chicken curry
Yamarita Ingredients
So if you’ve never made Yamarita before, let me just tell you, you are in for such a treat! And the best part? The ingredients are so simple, you probably already have most of them sitting in your kitchen right now. Let’s talk about each one!

- Yam: Obviously, we have to start with the yam because, it is the star of this recipe. You want to go for a good white yam the kind that’s firm and starchy. That firmness is really important because your yam needs to survive being parboiled and fried without falling apart on you. Nobody wants mushy Yamarita! When you slice it, try to keep the pieces even so they cook at the same rate.
- Eggs: Think of the eggs as the glue that holds your whole coating together. Once you’ve parboiled your yam, you’re going to dip each piece into a whisked egg mixture, and that egg is what makes everything else the flour, the breadcrumbs cling on for dear life. Without the egg, your coating would just slide right off in the oil. So yes, eggs are absolutely doing the most here!
- Butter: Now this is where things get a little fancy! A bit of melted butter goes right into your egg batter, and it makes such a difference. It adds this gorgeous richness and a subtle creamy flavour that takes the coating from “nice” to “wait, what IS that?!” You can use salted or unsalted either works beautifully.
- Flour: Plain all-purpose flour is your best friend here. It goes into the egg batter and gives it that thickness and body it needs to actually coat the yam properly. It also plays a big role in getting that lovely light crust when the yam hits the hot oil. Without it, the batter would be too thin and runny, and we definitely don’t want that!
- Sugar: Okay, THIS is the secret ingredient that makes Yamarita so special and different from regular fried yam. A little sugar in the batter gives it that slightly sweet flavor that works so beautifully against the salt. That sweet-savory combo? Absolutely addictive. Don’t skip it, don’t reduce it just trust the process and thank me later!
- Salt: You’ll notice salt appears twice in this recipe, and that is completely intentional! The first time, you’re adding it to the water when you parboil the yam this seasons the yam itself from the inside out. The second time, it goes into the egg batter to season the coating. Seasoning in layers is always the move in cooking, and Yamarita is no exception!
- Corn flour: Now this is a really exciting addition! Corn flour works alongside the regular flour in the batter and it does something really special, it makes the coating extra crispy and light when it hits the hot oil. It also gives the crust a beautiful golden color that looks absolutely stunning. If you’ve ever wondered how some fried foods get that extra satisfying crunch, corn flour is usually the secret behind it!
- Dry Pepper: And here’s the ingredient that gives Yamarita its personality! Though optional, but when dry pepper goes into the egg batter, it adds a gentle but noticeable heat that balances out the sweetness of the sugar beautifully. It’s that little kick at the end of each bite that keeps you coming back for more. Not too much, not too little — just enough to remind you that this is a proper Nigerian recipe through and through! Pin this potato balls recipe.
- Breadcrumbs: Last but absolutely not least the breadcrumbs! This is your final coating before the yam goes into the oil, and it is the reason Yamarita has that incredible crunch that makes it so satisfying to bite into. Roll each piece generously and make sure it’s fully covered. The breadcrumbs fry up golden and crispy and honestly, just looking at them in the pan will make you so hungry.
How to Make Yamarita (Step by Step Guide)
Step 1: Start by getting your yam and cutting it into circles. Since the yam is long, just place your knife into it. Cut straight across all the way down from one end to the other. These circular cuts are what give you those beautiful thick yam pieces that are perfect for coating and frying.
Step 2: Take each yam circle and peel off the back. Get your knife or a peeler and carefully remove all of the skin. Make sure no rough or brown bits are left behind. You want clean, smooth yam pieces.
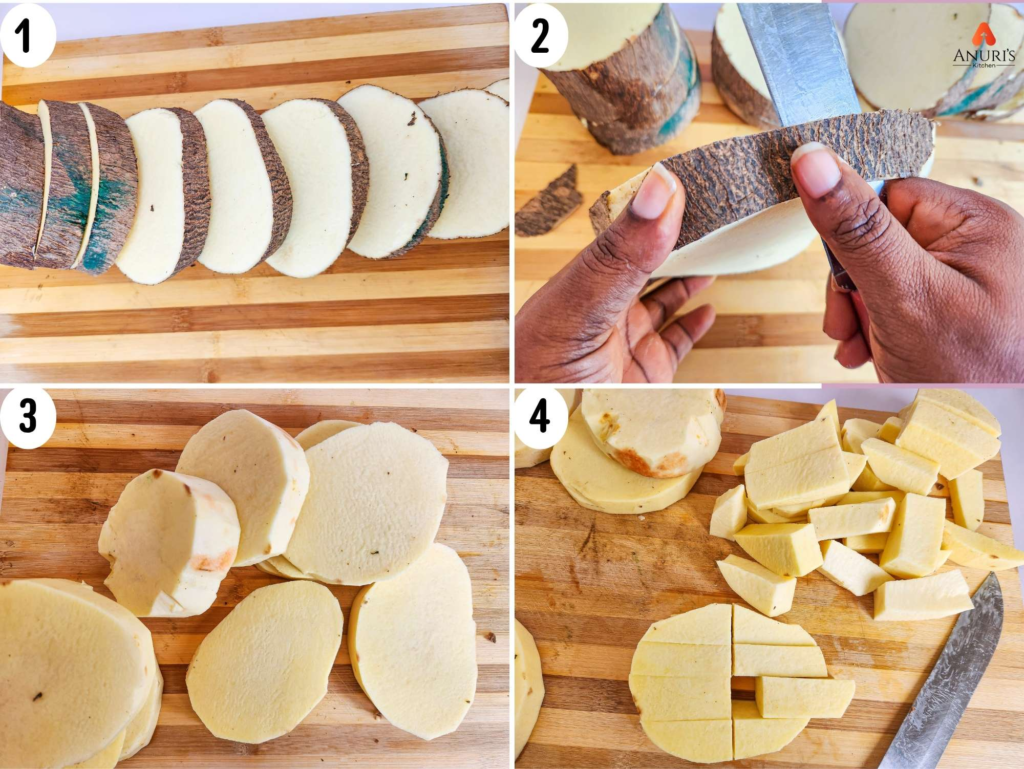
Step 3: Repeat the peeling process for all the remaining yam circles and set them aside. Take your time here. Well peeled yam makes for a much better finished result!
Step 4: Once all the skin is off, cut the yam into your desired sizes. Long rectangles work best for Yamarita. They’re thick enough to stay firm through the cooking process . Also, they give you that gorgeous ratio of fluffy yam inside to crispy coating outside.
Your family will love: Fried plantain
Step 5: Place all your cut yam pieces into a bowl, cover with water and give them a good wash. This removes any excess starch sitting on the surface and keeps your yam looking clean and fresh before cooking.
Step 6: Pour the washed yam directly into a pot, add enough water to cover, and throw in your salt. The salt seasons the yam from the inside out while it cooks. This is so important because a well seasoned yam makes all the difference to the final taste.
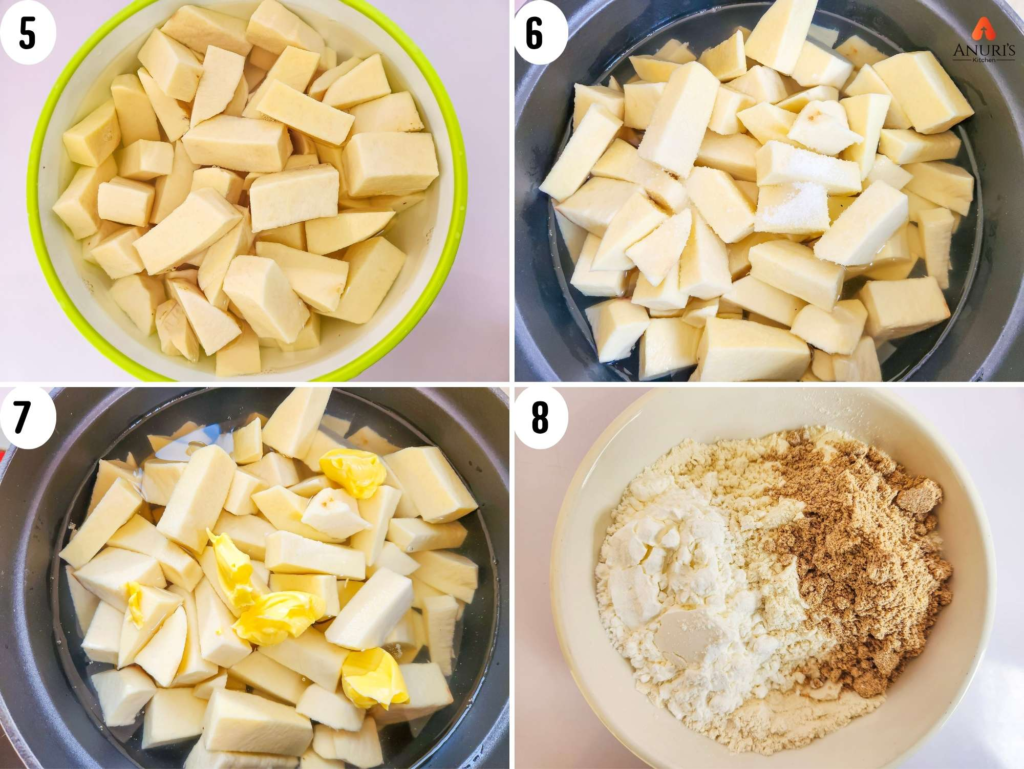
Step 7: Add your butter into the pot and allow the yam to cook. The butter adds a gorgeous richness and flavor right into the yam as it softens. Keep a close eye on it though, you want the yam cooked through and tender but still holding its shape firmly. Do not let it get soggy. Soggy yam will fall apart when you try to coat and fry it and we definitely don’t want that.
Step 8: While the yam is cooking, get your breadcrumbs, flour and corn flour ready and set them aside on a plate. Having your coating station all prepped and waiting means once the yam is ready you can move straight into the next steps without any rushing around.
In a separate plate, mix your flour, breadcrumbs and corn flour and sugar together until they are well combined. This three-in-one coating is what gives Yamarita that incredibly crispy, golden crust that everyone loves so much. The flour gives structure, the corn flour gives crunch and the breadcrumbs give that beautiful golden finish.
Step 9: Crack your eggs into a bowl and add your dry pepper. Remember, pepper is optional. The pepper goes in here so that every single piece of yam gets that gentle heat evenly distributed through the coating. Give it a good mix so the pepper is fully combined with the egg.
Step 10: Now set your two coating stations side by side, your egg and pepper mixture in one bowl and your flour, breadcrumb and cornflour mixture on a plate right next to it. Having everything within arm’s reach makes the coating process so smooth and enjoyable.
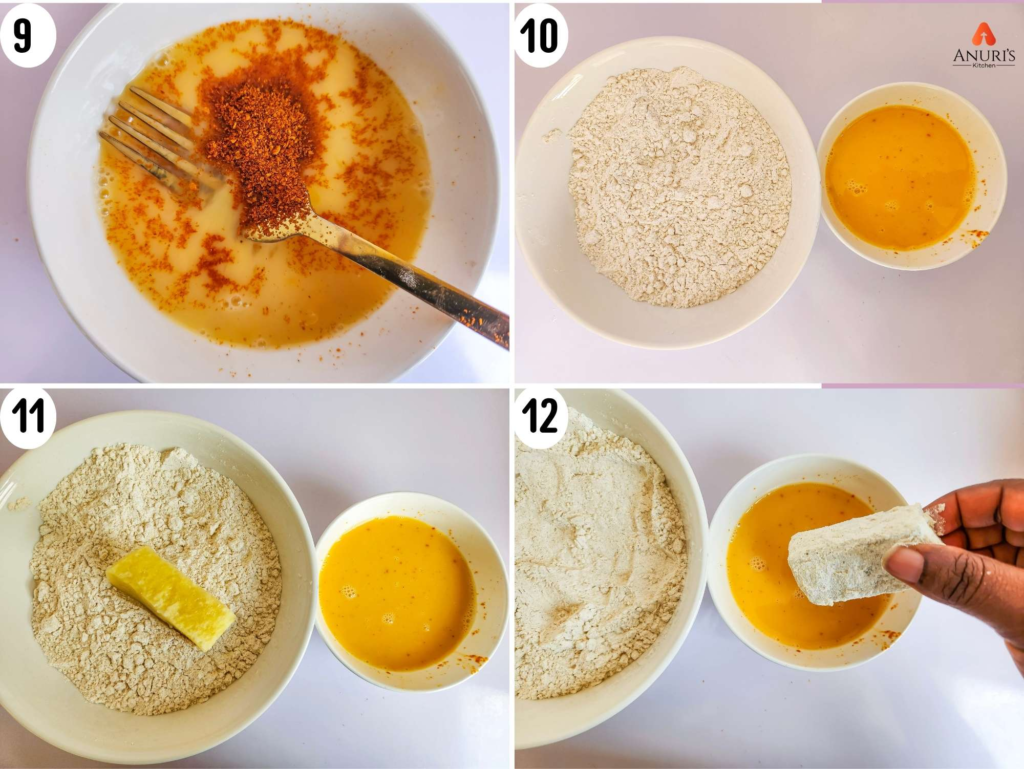
Step 11 : Take one piece of yam, dip it first into the flour mixture, then into the egg mixture, and then back into the flour mixture again. That double coating in the flour is the secret to getting that thick, extra crispy crust that makes Yamarita so irresistible. Make sure every part of the yam is fully covered at each stage.
Step 12: Continue the same coating process flour, egg, flour for every single piece of yam until they are all done. Set each coated piece aside on a tray as you go.
Step 13: Heat up a generous amount of oil in a pan on medium heat. You want the oil hot enough that when the yam goes in, it sizzles immediately. If the oil isn’t hot enough, the coating absorbs too much oil and turns greasy instead of crispy.
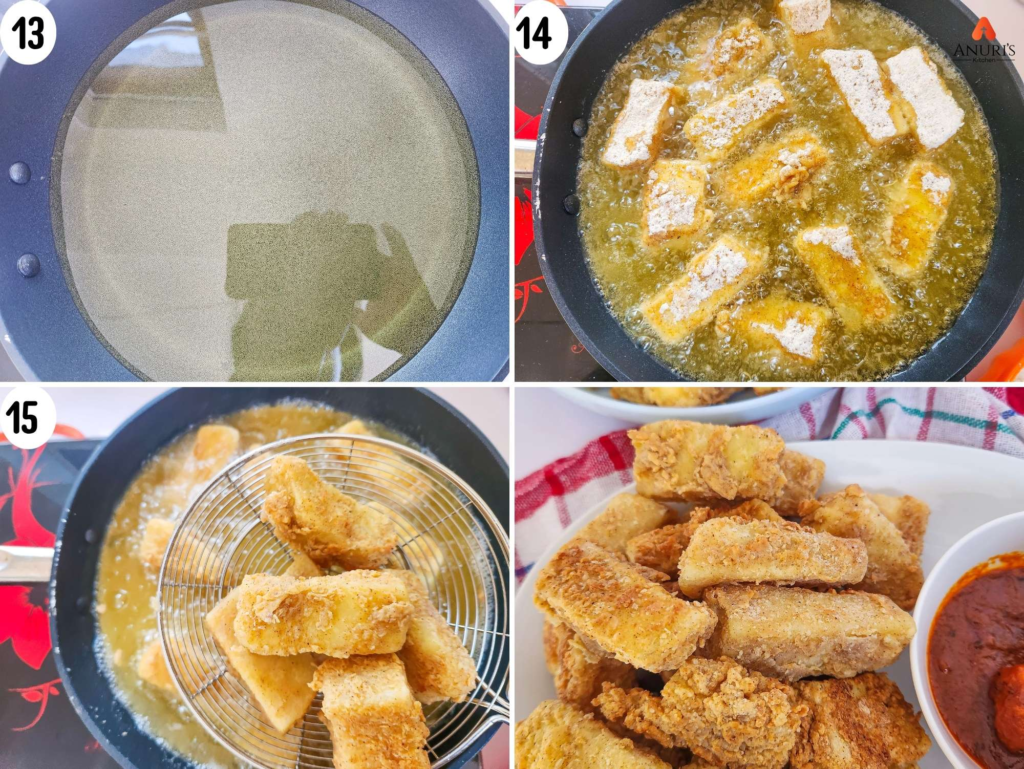
Step 14: Carefully lower your coated yam pieces into the hot oil and fry until they are deeply golden and crispy all over. Turn them gently so every side gets equal colour and crunch. Don’t overcrowd the pan, fry in batches if you need to so the oil temperature stays consistent throughout!
Step 15: Once golden and crispy, take them out of the oil and place on a sieve or paper towel to drain off any excess oil. And now — serve immediately while they are hot, crispy and absolutely perfect!
Pairings For Yamarita
Egg Sauce: Egg sauce and Yamarita is a combination that Nigerians have been waking up to for generations. The soft, savory scrambled egg sauce with its tomatoes. Peppers and onions is light enough to let the Yamarita shine while still adding so much flavor and substance to the plate. It’s quick to make, incredibly satisfying, and honestly one of the most comforting breakfast combinations you’ll ever have.
Pepper Sauce: For those who love their food with a proper kick, a spicy Nigerian pepper sauce is an absolutely unbeatable pairing! The heat from the sauce plays off the slight sweetness in the Yamarita coating in the most addictive way. Every bite is a beautiful balance of sweet, savory and spicy. This will have you going back for more until the plate is completely empty. Don’t say we didn’t warn you!
Vegetable Stew: Want something a little lighter but still incredibly flavourful? A well-made vegetable stew is a wonderful pairing that adds freshness and colour to your plate. The natural sweetness of the vegetables works beautifully alongside the Yamarita. This makes the whole meal feel a little more balanced without sacrificing any of the deliciousness. It’s a great option if you’re serving Yamarita as a full dinner rather than a snack or breakfast!
Tomato Stew: Now if you really want to go all out and serve something truly special, pair your Yamarita with a rich, bold Ofada stew! The deep, smoky, intensely flavored stew with its assorted meats is a combination that feels like a full celebration on a plate. It’s indulgent, it’s deeply satisfying, and it is the kind of meal that people talk about long after the plates have been cleared. Save this one for when you really want to impress!
Yamarita is best enjoyed fresh out of the pan while the coating is still crunchy. Serve it with a cold drink like zobo, a spicy dipping sauce, or even some fried eggs on the side.
Try this sauce for the whole household: Curry Goat
However you choose to serve it, Yamarita has this incredible ability to make any meal feel like a special occasion. So go ahead, make a big batch, pair it with your favourite stew, gather your people around the table and enjoy every single golden, crispy, delicious bite.
Print
Yamarita
- Total Time: 1 hour
- Yield: 4 servings 1x
Description
Yamarita is a delicious West African dish made with crispy fried yam slices layered with a flavorful egg and vegetable sauce. It’s a simple yet satisfying meal that combines the softness of yam with a savory, slightly spicy egg mixture—perfect for breakfast, lunch, or dinner.
Ingredients
-
- Yam – Firm white yam, sliced evenly so it holds its shape when boiled and fried.
- Eggs – Helps the coating stick to the yam and bind everything together.
- Butter – Adds a rich, slightly creamy flavor to the batter.
- All-purpose flour – Gives the batter structure for a light crust.
- Corn flour – Helps create an extra crispy, golden coating.
- Sugar – Adds a subtle sweetness that balances the savory flavors.
- Salt – Seasons both the yam (during boiling) and the batter.
- Dry pepper (optional) – Adds a mild heat for extra flavor.
- Breadcrumbs – Final coating that gives Yamarita its crunchy texture.
Instructions
Step 1: Slice yam into thick round pieces.
Step 2: Peel off the skin completely from each piece.
Step 3: Repeat peeling for all yam and set aside.
Step 4: Cut peeled yam into thick rectangular strips.
Step 5: Wash yam in water to remove excess starch.
Step 6: Place yam in a pot, add water and salt.
Step 7: Add butter and boil until tender but still firm.
Step 8: Prepare coating by mixing flour, corn flour, breadcrumbs, and sugar.
Step 9: In another bowl, whisk eggs with dry pepper (optional).
Step 10: Set up coating station with both mixtures side by side.
Step 11: Dip yam into flour mix, then egg, then back into flour mix.
Step 12: Repeat coating process for all yam pieces.
Step 13: Heat oil on medium heat.
Step 14: Fry yam in batches until golden and crispy, turning evenly.
Step 15: Remove, drain excess oil, and serve hot.
Notes
- Use firm yam
- Do not over boil
- Always use boiling water