Potato Balls
There is something incredibly satisfying about biting into a warm, crispy potato balls and discovering the soft, fluffy filling inside. The contrast between the golden outer layer and the tender potato center makes it almost impossible to stop at just one.
It is one of those simple snacks that brings instant comfort and joy.
For a long time, potato balls felt like something you could only enjoy at parties, restaurants, or special occasions. They always looked perfectly round, crispy, and delicious, and it was easy to assume they were difficult to make at home. And if you love simple, satisfying snacks made from everyday ingredients, my crispy chin chin recipe belongs on that same list — crunchy, golden, and completely addictive.

I often wondered how they achieved that perfect texture without the balls falling apart while frying.
However, I later discovered that potato balls are surprisingly easy to make. With the right method and a few simple ingredients, you can create crispy, flavorful potato balls right in your own kitchen without any stress.
In this tutorial, I will share with you a simple and fail-proof method to make perfectly crispy potato balls with a soft and delicious center. Whether you are making them as a snack, appetizer, or side dish, this recipe will quickly become one of your favorites.
Potato balls are loved for their versatility. They can be enjoyed on their own, served with a dip, or paired with other meals, making them a perfect snack for both kids and adults. If you are building a snack spread for the family, my guide on how to create a snack drawer for kids that isn’t messy is exactly what you need to keep everything organized and stress-free.
Ingredients
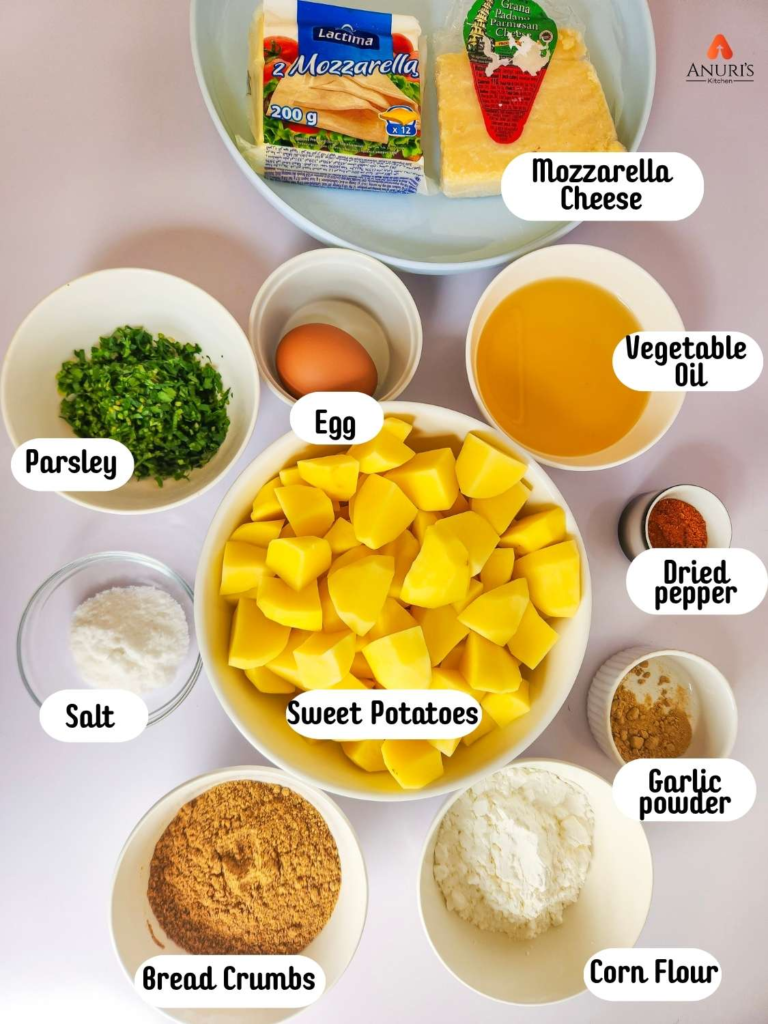
Crispy potato balls rely on simple ingredients that work together to create a crunchy exterior and a soft, flavorful center. Each ingredient plays an important role in texture, flavor, and overall appearance. When combined correctly, these ingredients produce a snack that is crispy on the outside and creamy on the inside.
Irish Potatoes: Irish potatoes form the base of this recipe. They provide the soft, fluffy texture that gives the snack its rich and satisfying bite. When cooked and mashed, the potatoes create a smooth mixture that holds the other ingredients together.
Choose firm, fresh potatoes with smooth skin because they mash easily and produce a better texture. After boiling or steaming, mash them until smooth so the mixture blends well with the seasonings and other ingredients.
Bread Crumbs: Flavored bread crumbs create the crispy outer coating. They add texture and help form the crunchy layer that develops during frying.
Many flavored bread crumbs already contain herbs and spices, which enhance the overall taste. When you roll the potato mixture in the crumbs, they stick to the surface and create that golden, crispy crust after frying.
Corn Flour: Corn flour helps bind the mixture and improves the texture. It also helps the coating stick properly to the potato mixture.
In addition, corn flour contributes to the crispiness during frying. The light coating it creates allows the outer layer to become crunchy without making the snack heavy.
Groundnut Oil: Groundnut oil works perfectly for deep frying because it handles high temperatures well. It also produces a crisp exterior while keeping the inside soft.
This oil has a mild flavor that does not overpower the seasonings. As the balls fry, the oil helps develop the golden color and crunchy texture that make them so appealing.
Egg: Egg acts as a binding ingredient in this recipe. It helps hold the mashed potato mixture together and also allows the bread crumbs to stick properly.
When you dip the shaped balls in egg before coating them with bread crumbs, the crumbs attach easily and form an even layer around each piece.
Parsley: Parsley adds freshness and color to the mixture. Its mild herbal flavor balances the richness of the potatoes and cheese.
Chopped parsley also improves the appearance by adding small green flecks throughout the mixture. This simple herb makes the snack look more vibrant and appetizing.
Salt: Salt enhances the natural flavor of the potatoes and balances the other ingredients. Without salt, the mixture would taste bland.
Adding the right amount ensures that every bite tastes well-seasoned and satisfying.
Garlic powder: is the seasoning of choice here and it is such a good one! It brings a warm, savory depth to the mixture that adds that extra layer of flavor without being too overpowering. Because it’s in powder form, it blends seamlessly into the mixture making sure every single bite gets that same consistent, garlicky warmth all the way through. A little goes a long way, so don’t overdo it
Dried red pepper: Pepper introduces a gentle heat that lifts the flavor of the dish. It adds a subtle spicy kick without overpowering the other ingredients
You can easily adjust the amount depending on how spicy you want the final result to taste.
Mozzarella Cheese: Mozzarella cheese creates the delicious melted center that many people love. When heated, the cheese becomes soft and stretchy, which gives the snack an irresistible texture.
Placing small cubes of mozzarella inside each portion creates a creamy surprise when you bite into it. The mild flavor of the cheese also blends perfectly with the seasoned potato mixture.
These ingredients combine to create a snack that delivers both flavor and texture.
With the right combination of these ingredients, you can create a delicious snack that works perfectly for parties, family meals, or quick appetizers.
How to make Crispy Potato Balls
Step 1: Wash, Peel and Boil Your Potatoes
You want to start by washing your potatoes really well under running water to get rid of any dirt. Then peel them, cut them into even chunks so they cook at the same rate, and toss them into a pot of salted boiling water. Let them cook until they are completely tender. If a fork can go through the potato without resistance, then you’re good to go.
Step 2: Mash the Boiled Potatoes
Once your potatoes are fully cooked, drain out all the water completely and let them sit for a minute or two to let any extra steam escape. Then mash them while they’re still hot — this is really important because hot potatoes mash so much smoother than cold ones! You want a lump-free, fluffy mash that will be easy to shape later. Take your time here and mash until it’s completely smooth.

Step 3: Add All Your Ingredients
Now this is where the flavour building begins! Add all your seasonings and ingredients, your garlic powder, salt, and whatever else your recipe calls for straight into the mashed potato. This is your one big chance to make sure the filling is well seasoned and delicious all the way through, so don’t be shy!
Step 4: Mix Together Until Firm But Not Hard
Bring everything together and mix until all the ingredients are evenly combined and the mixture feels firm enough to hold its shape in your hand. You’re looking for a consistency that is easy to mold without being stiff or tough.
Step 5: Shape the Balls and Add the Cheese
Here comes the best part! Take a small portion of the mixture in your hand and flatten it slightly in your palm. Make a little hole right in the center, pop a piece of cheese inside. Then carefully close the mixture around it, sealing it completely. Roll it gently between your palms until you have a smooth, round ball with the cheese safely tucked away inside.
Step 6: Repeat and Set Aside
Go through the same process for all your potato mixture, fill, seal, roll, repeat! Once each ball is shaped, place it on a tray and set it aside. Try to keep them roughly the same size so they all fry evenly.

Step 7: Prepare Your Coating
Get your corn flour and breadcrumbs and spread them out on a plate or flat surface. Having everything set up and ready before you start coating makes the whole process so much quicker and less messy. This is your little production line and it works beautifully!
Step 8: Mix the Corn flour and Breadcrumbs Together
Combine the corn flour and breadcrumbs together on the plate and mix them well. The corn flour helps the coating stick firmly to the potato balls while the breadcrumbs give that incredible golden, crunchy crust when they hit the hot oil.
Step 9: Coat the Potato Balls
Now take each potato ball and roll it in the corn flour and breadcrumb mixture, making sure every single part of the surface is fully and evenly coated. Press the coating on gently so it sticks well and doesn’t fall off in the oil. A well coated potato ball is a crispy potato ball.

Step 10: Fry Until Golden
Pour a generous amount of oil into a pan and heat it up on medium heat. You want enough oil for the potato balls to be at least halfway submerged. Carefully lower them into the hot oil and fry, turning them gently as they cook so every side gets that gorgeous deep golden color. Don’t overcrowd the pan, fry in batches if you need to so the temperature of the oil stays consistent.
Step 11: Take Out of the Pan and Serve!
Once your potato balls are beautifully golden and crispy all over, take them out of the pan and place them on a paper towel to drain off any excess oil. Let them rest for few minutes.
How to Serve Your Potato Balls
These gorgeous little bites are best served hot and fresh while the outside is still crispy and the cheese inside is still warm and melty. Here are some wonderful ways to enjoy them

- Tomato dipping sauce or ketchup: the classic pairing that never ever gets old
- Garlic aioli or mayo: creamy, garlicky, and absolutely dreamy alongside the crispy coating
- Spicy pepper sauce: for those who love a little heat with their food, this combo is unbeatable
- Grilled or fried chicken: serve them as a side dish and watch them disappear off the plate instantly. They also pair incredibly well next to my asun jollof rice and pineapple fried rice for a full, impressive spread that will have everyone going back for seconds
- As a party snack or finger food: pile them high on a platter with toothpicks and a couple of dipping sauces and they will be the first thing to go at any gathering, guaranteed! If you are hosting, my stress-free brunch guide for 10 people will help you plan the whole event around crowd-pleasing bites just like these.
And don’t forget the drinks! My chilled homemade zobo drink is the perfect refreshing companion to these hot, crispy bites, the tartness cuts right through the richness of the fried coating. If you prefer something creamy and light, my naturally sweet tigernut drink is another wonderful pairing. It keeps things balanced and delicious.
Potato balls also sit beautifully on the same table as my fluffy pancakes for a sweet and savory breakfast spread that feels like a real occasion. And if you are planning a bigger party menu, my meat pie recipe is another crowd-pleasing finger food that belongs right next to these on the platter.
Try this recipe and your family will thank you.
Print
Potato Balls
- Diet: Dairy-Free, High protein, Vegan
Description
Golden, crunchy on the outside and soft on the inside, these potato balls are a delicious snack or side dish that everyone will love. Made with simple ingredients and seasoned to perfection, they’re perfect for parties, quick bites, or comfort food cravings. Serve them hot for the best crispy experience.
Ingredients
- Irish Potatoes: The base of the recipe, mashed into a smooth, fluffy mixture that holds everything together.
- Bread Crumbs: Creates a crispy, golden coating for a crunchy outer layer.
- Corn Flour: Helps bind the mixture and improves crispiness while frying.
- Groundnut Oil: Used for deep frying, giving a golden, crunchy exterior and soft inside.
- Egg: Acts as a binder and helps the bread crumbs stick evenly.
- Parsley: Adds freshness, color, and a light herbal flavor.
- Salt: Enhances and balances all the flavors.
- Garlic Powder: Adds warm, savory depth to the mixture.
- Dried Red Pepper: Gives a mild spicy kick and boosts flavor.
- Mozzarella Cheese: Creates a soft, stretchy, melted center for a rich bite.
Instructions
Step 1: Wash, peel, and cut the potatoes into even chunks, then boil in salted water until very soft and tender.
Step 2: Drain the potatoes well and mash while still hot until smooth, fluffy, and lump-free.
Step 3: Add all seasonings and ingredients into the mashed potatoes and mix well for full flavour.
Step 4: Stir everything together until the mixture is firm enough to hold shape but still soft to mold.
Step 5: Take a portion of the mixture, flatten it, add mozzarella cheese in the center, then seal and roll into a smooth ball.
Step 6: Repeat the shaping process for all the potato mixture and place the balls on a tray.
Step 7: Prepare your coating by setting out corn flour and breadcrumbs on a plate or flat surface.
Step 8: Mix the corn flour and breadcrumbs together evenly to create a crisp coating blend.
Step 9: Roll each potato ball in the coating mixture, ensuring every surface is fully covered and well pressed.
Step 10: Heat groundnut oil in a pan and fry the potato balls on medium heat until golden and crispy, turning occasionally for even cooking.
Step 11: Remove from oil and place on paper towels to drain excess oil, then let cool slightly before serving.
Notes
Mash the potatoes while they are still hot because they become smoother and easier to work with, giving a lump-free texture. Make sure the mixture is well-seasoned at the mashing stage so every bite is flavorful and not bland.
The potato mixture should be firm enough to hold its shape but still soft enough to mold easily; if it’s too soft, the balls may fall apart during frying. Always seal the cheese completely inside the potato mixture to prevent it from leaking out while frying.
Ensure all potato balls are shaped as evenly as possible so they cook at the same rate. Coat them properly and press the breadcrumbs gently so the coating sticks well and forms a crisp crust.
Fry on medium heat only, as high heat can brown the outside too quickly while leaving the inside undercooked. Avoid overcrowding the pan so the oil temperature stays steady and the balls fry evenly. Finally, drain on paper towels after frying to remove excess oil and keep them crisp.